During the Kareo 102 training, customers will be introduced to revenue cycle management post claim processing. This includes an overview of basic reporting in Kareo, basic payment posting, and submitting patient statements.
Payment Posting in Kareo
Includes an introduction into both electronic and manual payment posting.
Electronic Payment Posting
Electronic payment posting in Kareo is the process of posting payments using an Electronic Remittance Advice (ERA).
Step | Description | Helpful Knowledge |
|---|
Completing EDI Enrollment | The first step to be able to post payments using ERAs is to ensure you have completed your EDI enrollment for ERAs. | For more information on completing EDI enrollment, refer to this resource: |
Notification of an ERA to post | When ERAs are received, a notification will be present in the “To Do List” of the home screen.  | |
Posting a Payment Using an ERA | Double click on an ERA to open the payment information. Scroll through the ERA to review the payment details. Once reviewed, click Post Payment at the bottom of the screen.  Payment details will auto populate based on the information in the ERA. Once details have been verified, select Apply Now.  Kareo will then gather the applicable clients and service lines from the ERA (1).  The EOB information for each client will auto populate (2). If advanced posting or adjustment options are required, access the More category (3). Select Status to choose the next steps for the claim (4). Select Next Line (5) until all payments have been posted and the unapplied balance reads $0 (6). Select Save to complete the payment posting (7).
| Selecting the Claim ID will open up the transaction details of the claim. Selecting Mark as Reviewed allows you to review the ERA without yet posting the payment. Batch # is an optional field that providers can utilize with their own naming conventions For advanced payment posting scenarios, please refer to the Kareo Help Center for additional resources such as balance forwards and reversals. https://helpme.kareo.com/01_Kareo_PM or email support@kareo.com for assistance.
|
Manual Payment Posting
Manual payment posting in Kareo is the process of posting payments without electronic data. These scenarios often include payments received from patient statements or utilizing EOBs retrieved from payor sites.
Step | Description | Helpful Knowledge |
|---|
Receiving a Manual Payment | From the Kareo home page, select the credit card icon  or navigate to Encounters → Receive Payment. | |
Manually Posting a Payment | Manually input all payment details into the appropriate fields.  Once finished, select Apply Now. Search by either the encounter or the patient to pull up the open encounters to post payments to.  Follow the same steps as outlined in electronic payment posting method. The EOB information for each client will need to be manually inputted (2). If advanced posting or adjustment options are required, access the More category (3). Select Status to choose the next steps for the claim (4). Select Next Line (5) until all payments have been posted and the unapplied balance reads $0 (6). Select Save to complete the payment posting (7).
| If the payment is coming from an insurance funder, select Insurance in the type drop down menu. Select the Insurance button to choose the applicable funder. If the payment is coming from a patient, select Patient in the type drop down menu. Select the Patient button to choose the applicable patient.
|
Patient Statements
Includes an introduction into sending patient statements and the modifications that are possible.
Step | Description | Helpful Knowledge |
|---|
Modifications to Patient Statements | Navigate to Settings → Options → Patient Statement Options This area allows for modifications to the information that will prepopulate on patient statements. 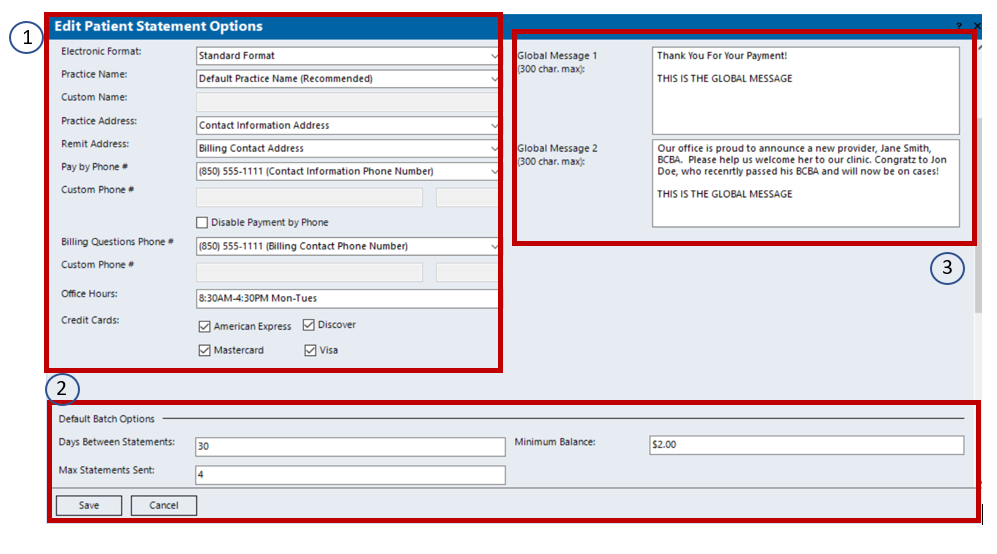 Available modifications to the practice name, contact information, and credit cards that are accepted (1). Customization of the Default Batch Options (2). Global Messaging - an area to list custom text on statements. (3)
| Default Batch Options include days between statements, max statements sent, and minimum balance. This means that if days between statements is set to 30, max statements is set to 4, with a minimum balance of $5.00 that a patient would not receive patient statements more frequently than every 30 days for a maximum of 4 statements sent, each with minimum balances of $5.00 or greater.
Global Messaging - an optional area that enables a customer to input a generalized note or notification to clients. Example: notification of upcoming closures, introductions of new clinicians, etc. It is NOT recommended to put patient specific information here.
|
Generating Patient Statements | | |
Introduction to Kareo Reporting